duyhungbn.tk-Mikrotik-routerOS
http://getintopc.com/softwares/operating-systems/mikrotik-routeros-free-download/
MikroTik RouterOS 5.20,5.26 & 6.7 Cracked Full Level 6


Now open it using any html editor, I always prefer FRONTPAGE for editing HTML pages due to its easy interface. Customize it according to your need, You must have some prior knowledge of some website / html editing. You can insert your logo , advertisement and lot more in this page. After you are done, simply Upload the file back from where you downloaded it. use drag n drop feature. For beginners, I recommend you not to change any default variable, just ad your logo n text , After you are familiarized with the structure, you can build your own fully customized login page.
http://getintopc.com/softwares/operating-systems/mikrotik-routeros-free-download/
MikroTik RouterOS 5.20,5.26 & 6.7 Cracked Full Level 6
RouterOS
MikroTik RouterOS is the operating system of MikroTik
RouterBOARD hardware.
It can also be installed on a PC and will turn it into a router
with all the necessary features - routing, firewall, bandwidth
management, wireless access point, backhaul link, hotspot
gateway, VPN server and more.
RouterOS is a stand-alone operating system based on
the Linux v2.6 kernel, and our goal here at MikroTik is
to provide all these features with a quick and simple
installation and an easy to use interface.
You can try RouterOS today, go to www.mikrotik.com and
download the installation CD image. The free trial provides
all of the features with no limitations.
In the following pages you will find examples of some of the
most important RouterOS features.
Homepage and more info here:
SCREENSHOT AFTER INSTALL

SCREENSHOT AFTER UPDATE TO 5.20

DOWNLOADS
PASSWORD
HOW TO
1. INSTALL WITH ALL OPTION
2. REMOTE WITH WINBOX TO INSERT KEYS
3. REMOTE WITH WINBOX TO UPDATE V5.20
4. REBOOT
5. BOOOMMMM :d CEK YOUR ROUTER LICENSE
SALAM SEMPAX !!!!
AIO DIRECT LINK
UPDATE ISO v5.20 Cracked Support License Level 6 + INCLUDE KEYS
DOWNLOADS DIRECT LINK SUPPORT RESUME
Mirror
Update MikroTik RouterOS v5.26 Cracked Full License Lev6 With HunterTik 2.3.1.1
You Can Test 6.7 With Huntertik Using Metode Like Video youtube
Vmware Image Mikrotik 6.5
Password
Vmware Image Mikrotik 6.6
Vmware Image Mikrotik 6.10
MikroTik RouterOS is the operating system of MikroTik
RouterBOARD hardware.
It can also be installed on a PC and will turn it into a router
with all the necessary features - routing, firewall, bandwidth
management, wireless access point, backhaul link, hotspot
gateway, VPN server and more.
RouterOS is a stand-alone operating system based on
the Linux v2.6 kernel, and our goal here at MikroTik is
to provide all these features with a quick and simple
installation and an easy to use interface.
You can try RouterOS today, go to www.mikrotik.com and
download the installation CD image. The free trial provides
all of the features with no limitations.
In the following pages you will find examples of some of the
most important RouterOS features.
Homepage and more info here:
Code: Select all
http://www.mikrotik.com/
SCREENSHOT AFTER INSTALL
SCREENSHOT AFTER UPDATE TO 5.20
DOWNLOADS
Code: Select all
http://rapidgator.net/file/40440602/Mikrotik-5.20_cracked_full_license_level_6.rar.html
http://www.gamefront.com/files/22229304/Mikrotik-5.20_cracked_full_license_level_6.rar
http://rapidgator.net/file/40437328/Mikrotik-5.20_cracked_full_license_level_6.rar.html
http://minus.com/lbvYsLVfmS0gtz
http://d01.megashares.com/dl/LuU7xR0/Mikrotik-5.20_cracked_full_license_level_6.rar
http://www.gamefront.com/files/22229304/Mikrotik-5.20_cracked_full_license_level_6.rar
http://rapidgator.net/file/40437328/Mikrotik-5.20_cracked_full_license_level_6.rar.html
http://minus.com/lbvYsLVfmS0gtz
http://d01.megashares.com/dl/LuU7xR0/Mikrotik-5.20_cracked_full_license_level_6.rar
PASSWORD
Code: Select all
SEMPAX
HOW TO
1. INSTALL WITH ALL OPTION
2. REMOTE WITH WINBOX TO INSERT KEYS
3. REMOTE WITH WINBOX TO UPDATE V5.20
4. REBOOT
5. BOOOMMMM :d CEK YOUR ROUTER LICENSE
SALAM SEMPAX !!!!
AIO DIRECT LINK
Code: Select all
http://code.google.com/p/mikrotik-installer/
UPDATE ISO v5.20 Cracked Support License Level 6 + INCLUDE KEYS
DOWNLOADS DIRECT LINK SUPPORT RESUME
Code: Select all
Mirror
Code: Select all
http://www.mediafire.com/?di20gowzp9d9xdh
http://rapidgator.net/file/40974982/Mikrotik-5.20_Full_Lev6.rar.html
http://u5.~ Disallowed ~/go/29g1cxorlbgri/?upld=1
http://d01.megashares.com/dl/yChzNAq/Mikrotik-5.20_Full_Lev6.rar
http://cramit.in/cwfa9n28pwju/Mikrotik-5.20_Full_Lev6.rar.html
http://ulozto.net/xpGmqx7/mikrotik-5-20-cracked-iso
http://rapidgator.net/file/61094868/Mikrotik-5.20_Full_Lev6.rar.html
http://rghost.net/41945692
http://www.gamefront.com/files/22697648/Mikrotik-5.20_Full_Lev6.rar
http://ge.tt/2jyRcjS
http://bayfiles.com/file/uNbH/FbwY1I/Mikrotik-5.20_Full_Lev6.rar
http://d01.megashares.com/dl/g7KZzGC/Mikrotik-5.20_Full_Lev6.rar
http://uploaded.net/file/c7kqkeve
http://rapidgator.net/file/61095419/Mikrotik-5.20_Full_Lev6.rar.html
http://uploaded.net/file/c7kqkeve
http://www.crocko.com/690D753176DA489DB4C7182529F2EA66/Mikrotik-5.20_Full_Lev6.rar
http://www.uptobox.com/ycjwzc3qy3wk.html
http://bayfiles.com/file/uNkX/kRNhmd/Mikrotik-5.20_Full_Lev6.rar
http://rapidgator.net/file/61096042/Mikrotik-5.20_Full_Lev6.rar.html
http://uploadhero.co/dl/8gJZuE5x
http://uploaded.net/file/k4msejq2/Mikrotik-5.20_Full_Lev6.rar
Update MikroTik RouterOS v5.26 Cracked Full License Lev6 With HunterTik 2.3.1.1
Code: Select all
http://sys-data.com/mirror/5.x/routeros-5.26/mikrotik-5.26.iso
Code: Select all
http://www.mikrotik-software.de/downloads/mikrotik-5.26.iso
Code: Select all
http://easyprotection.ru/mikrotik524/mikrotik-v5.24/HunterTik-v2.3.1.1.iso
Code: Select all
ftp://ftp.caiag.kg/mikrotik-v5.24/HunterTik-v2.3.1.1.iso
You Can Test 6.7 With Huntertik Using Metode Like Video youtube
Code: Select all
http://www.youtube.com/watch?v=xF2a4VtMt00
Code: Select all
http://mikrotik.c4.hu/routeros-6.0rc5/mikrotik-6.0rc5.iso
Code: Select all
http://mikrotik.c4.hu/routeros-6.7/routeros-x86-6.7.npk
Code: Select all
http://easyprotection.ru/mikrotik524/mikrotik-v5.24/HunterTik-v2.3.1.1.iso
Vmware Image Mikrotik 6.5
Code: Select all
Link: http://www.solidfiles.com/d/18436d3690/
Code: Select all
Direct Link 1: http://dl.digiboy.ir/mikrotik-routeros-6.5-vmware.7z
Code: Select all
Direct Link 2: http://files.digiboy.ir/mikrotik-routeros-6.5-vmware.7z
Code: Select all
www.digiboy.ir
Vmware Image Mikrotik 6.6
Code: Select all
Link: http://www.solidfiles.com/d/8cc6f21c70/
Mirror: http://dl.digiboy.ir/mikrotik-routeros-6.6-vmware.7z
Filesize: 46.2 MB
MD5 Checksum: EC26681C78DEA4A15275E57868633BC1
Password: www.digiboy.ir
Mirror: http://dl.digiboy.ir/mikrotik-routeros-6.6-vmware.7z
Filesize: 46.2 MB
MD5 Checksum: EC26681C78DEA4A15275E57868633BC1
Password: www.digiboy.ir
Vmware Image Mikrotik 6.10
Code: Select all
Link: http://www.solidfiles.com/d/2489be06d4/mikrotik-routeros-6.10-vmware.7z
Mirror: http://dl.digiboy.ir/mikrotik-routeros-6.10-vmware.7z
Filesize: 34.7 MB
MD5 Checksum: 26C2FC15C718866E6CD96A08741FB0B4
Password: www.digiboy.ir
Mirror: http://dl.digiboy.ir/mikrotik-routeros-6.10-vmware.7z
Filesize: 34.7 MB
MD5 Checksum: 26C2FC15C718866E6CD96A08741FB0B4
Password: www.digiboy.ir
http://mikrotikbook.blogspot.com/2014/05/mikrotik-routeros-520526-67-cracked.html
Mikrotik Router Password List
| Mikrotik | ||
| Model | Default Username | Default Password |
| Router OS all | admin | (none) |
| Router OS 02/09/2017 | admin | (none) |
| Mikrotik | admin | (none) |
How to Recover Mikrotik ADMIN account Forgotten Password
According to information on Mikrotik WIKI and forums, it is not possible to recover the passwords without resetting whole mikrotik box (resulting in loss of all configuration also). However following are few methods to recover the password.
0# Recover password from BACKUP file using a website https://www.mikrotikpasswordrecovery.net/
If you require it on urget basis, you can email me your config, and I will recover it for you, just in case if you dont have linux or urgency is required.
1# Recover password from BACKUP file using Ubuntu or Linux LIVE CD [updated April 2014]
2# Recover password by mounting Mikrotik Hard disk in Linux LIVE CD and do recovery [not updated since last year, it was tested with 5 version)
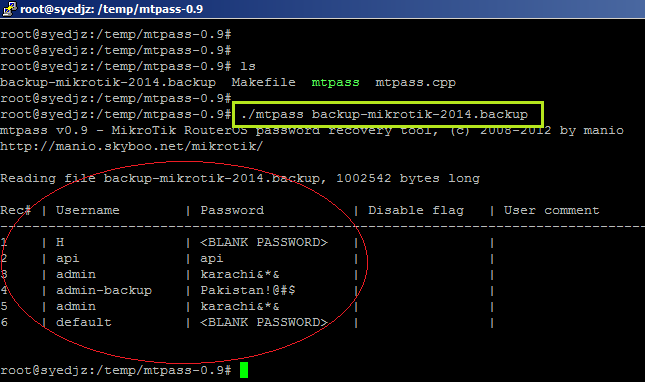
2# Recover password from BACKUP file using Linux [working as of april 2014]
Login to your Ubuntu / Linux Box,
Download mikrotik password recovery tool and compile it by following commands,
Download mikrotik password recovery tool and compile it by following commands,
1
2
3
4
5
6
7
8
9
10
11
| sudo apt-get updatesudo apt-get install build-essential g++ libssl-dev libcurl4-gnutls-dev libexpat1-dev gettext libz-devmkdir /tempcd /temptar jxvf mtpass-0.9.tar.bz2cd mtpass-0.9make#If you receive *error* after issuing make command, then you can use following command to compile it in desi JUGAAR (workaround) way heheheheg++ mtpass.cpp -lgnutls-openssl -o mtpass |
Now upload/copy your Mikrotik Backup File to /temp folder ( Either using WINSCP gui tool, WEBMIN File Manager, via USB or any other method you like)
Now Issue the following command
1
| ./mtpass /temp/zaibmikrotik.backup |
It will show you all account passwords in few seconds.
As shown in the image below . . .
As shown in the image below . . .
..
3# Recover password of x86 PC Version
Boot from Ubuntu LIVE CD
(I used Ubuntu 9.1 Desktop CD in this example, you can download it from following link.
(I used Ubuntu 9.1 Desktop CD in this example, you can download it from following link.
Select “Try Ubuntu”
As Shown in the image below . . .
As Shown in the image below . . .

After you see Desktop, Open TERMINAL from APPLICATION > ACCESSORIES > TERMINAL
Now change to root user by
sudo su
sudo su
Now check your partitions by issuing
fdisk -l
fdisk -l
you will see something like below image.

You partition can be different, use your judgment to see what partition mt is in, either by mounting it one by one.
Now mount it any folder , for example
mkdir /temp
mount -t auto /dev/sda2 /temp
mount -t auto /dev/sda2 /temp
Now check its content by ls /temp and you will something like below image
*********************************************************
*********************************************************
Now Copy the ‘mikrotik password file’, (in newer ROS , it is located in /rw/store/user.dat) to USB flash drive, It will be used to decode the password.
(The USB flash drive should be ‘plug and play’ in Ubuntu Live. Just plug it in usb port and it will appear on desktop in few seconds , OR you can also copy it your network pc via configuring interface lan card accordingly)
(Note: In older ROS it is /nova/store/user.dat)
(The USB flash drive should be ‘plug and play’ in Ubuntu Live. Just plug it in usb port and it will appear on desktop in few seconds , OR you can also copy it your network pc via configuring interface lan card accordingly)
(Note: In older ROS it is /nova/store/user.dat)
Now shutdown live cd.
then Boot from your Ubuntu box, and use the Method # 2 , described earlier in this article to decode password using mtpass tool from this file.
Copy the user.dat file where you have decompressed mt password tool . e.g /temp , now use the mt pass tool to recover password from this file.
./mtpass user.dat
and you will see your admin password.

As Now you have seen the password now, you can login into mikrotik pc router with your Old Password
If your architecture is ROUTERBOARD RB series, Please follow the below guide.
Also it’s possible for you to send an SMS to your router, tell it to run a script (parameters supported) and the router can even respond, as it also supports SMS sending! More here:
http://wiki.mikrotik.com/wiki/Sms
http://wiki.mikrotik.com/wiki/Sms
You can setup an script just in case you forgot your password , and via sending sms, it can reset it to default. or send you return the new/original password.
Regard’s
SYED JAHANZAIB
SYED JAHANZAIB
Mikrotik Hotspot Quick Setup Guide + Tips n Tricks for Hotspot

A HOTSPOT is way to provide internet access to subscribers by means of an easy to use login interface as it does not require any client software/driver/dialer at user end. To log in, users may use almost any web browser , so they are not required to install additional software.It is also possible to allow users to access some web pages without authentication using Walled Garden feature.
In my personnel opinion, Hotspot is best suited for ad hoc situations, where you cannot control how the client has their machines configured. This is generally useful in Conference Rooms, Hotels, Cafe’s , Restaurants and likewise since people will come and go and you have few permanent users.
One big advantage of using hotspot is that HotSpot does not require any client software/driver/dialer. One disadvantage of using HotSpot is that its usually requires your client to open up his browser to log in before he can use your service . So users wanting to connect to your service using a router or some kind usually have a problem (as routers usually don’t support logging in via HTTP).
Following is a quick setup guide (CLI version) on how-to setup HOTSPOT server in Mikrotik using command interface.
This guide will help you in setting up . . .
# HOTSPOT server,
# It will also configure DHCP to assign users IP Address from 172.16.0.1-172.16.0.255 ip pool .
Change it accordingly.
Change it accordingly.
# I will add two Speed / Rate Limit Profiles, 256k and 512k, it will add a new user ‘zaib‘ password=test with 512k profile and user ‘test‘ Password=test with 256k Limit.
# It will Add Default Route to internet which is DSL router ip 192.168.2.2 ,
Change it accordingly.
Change it accordingly.
In this examples, Mikrotik have two interface cards.
Ether1 LAN = 172.16.0.1 / Connected with LAN/Hotspot users
Ether2 WAN = 192.168.2.1 / Connected with DSL router
DSL Router = 192.168.2.2
Ether2 WAN = 192.168.2.1 / Connected with DSL router
DSL Router = 192.168.2.2
Script Starts Below.
1
2
3
4
5
6
7
8
9
10
11
12
13
14
15
16
17
18
19
20
21
22
23
24
25
26
27
28
29
30
31
32
33
34
35
36
37
38
39
40
41
42
43
44
45
46
47
48
49
| /ip addressadd address=172.16.0.1/24 comment=LAN disabled=no interface=ether1 network=172.16.0.0add address=192.168.2.1/24 comment=WAN disabled=no interface=ether2 network=192.168.2.0/ip pooladd name=hs-pool-1 ranges=172.16.0.10-172.16.0.255/ip dnsset allow-remote-requests=yes cache-max-ttl=1w cache-size=10000KiB max-udp-packet-size=512 servers=192.168.2.2/ip dhcp-serveradd address-pool=hs-pool-1 authoritative=after-2sec-delay bootp-support=static disabled=no interface=ether1 lease-time=1h name=dhcp1/ip dhcp-server config set store-leases-disk=5m/ip dhcp-server network add address=172.16.0.0/24 comment="hotspot network" gateway=172.16.0.1/ip hotspot profileset default dns-name="" hotspot-address=0.0.0.0 html-directory=hotspot http-cookie-lifetime=3d http-proxy=0.0.0.0:0 login-by=cookie,http-chap name=default rate-limit="" smtp-server=0.0.0.0 split-user-domain=no use-radius=noadd dns-name=login.aacable.net hotspot-address=172.16.0.1 html-directory=hotspot http-cookie-lifetime=1d http-proxy=0.0.0.0:0 login-by=cookie,http-chap name=hsprof1 rate-limit="" smtp-server=0.0.0.0 split-user-domain=no use-radius=no/ip hotspotadd address-pool=hs-pool-1 addresses-per-mac=2 disabled=no idle-timeout=5m interface=ether1 keepalive-timeout=none name=hotspot1 profile=hsprof1/ip hotspot user profileset default idle-timeout=none keepalive-timeout=2m name=default shared-users=1 status-autorefresh=1m transparent-proxy=noadd address-pool=hs-pool-1 advertise=no idle-timeout=none keepalive-timeout=2m name="512k Limit" open-status-page=always rate-limit=512k/512k shared-users=1 status-autorefresh=1m transparent-proxy=yesadd address-pool=hs-pool-1 advertise=no idle-timeout=none keepalive-timeout=2m name="256k Limit" open-status-page=always rate-limit=256k/256k shared-users=1 status-autorefresh=1m transparent-proxy=yes/ip hotspot service-port set ftp disabled=yes ports=21/ip hotspot walled-garden ip add action=accept disabled=no dst-address=172.16.0.1/ip hotspot set numbers=hotspot1 address-pool=none/ip firewall nat add action=masquerade chain=srcnat disabled=no/ip hotspot useradd disabled=no name=admin password=123 profile=defaultadd disabled=no name=zaib password=test profile="512k Limit" server=hotspot1add disabled=no name=test-256k password=test profile="256k Limit" server=hotspot1/ip routeadd disabled=no distance=1 dst-address=0.0.0.0/0 gateway=192.168.2.2 scope=30 target-scope=10 |
Basic HOSTPOT is now configured. Now goto client pc, Upon booting, it will automatically receive ip from hotspot dhcp server, Open your browser and try to open any web site, You will see Hotspot Login page asking for credentials.

OR you can customize the hotspot login page to show your logo look like something

You can also make configuration changes via GUI.
Please read the following guide for easy n step by step guide on HOTSPOT setup.
http://wiki.mikrotik.com/wiki/Hotspot_server_setup
Please read the following guide for easy n step by step guide on HOTSPOT setup.
http://wiki.mikrotik.com/wiki/Hotspot_server_setup
HOWTO CUSTOMIZE HOTSPOT LOGIN PAGE
You can use some fancy good looking login page. To customize the login page, Open Winbox , Goto Files , here you will see various files, look at hotspot/login.html , Drag n Drop this file to Desktop. See the attached picture.

Now open it using any html editor, I always prefer FRONTPAGE for editing HTML pages due to its easy interface. Customize it according to your need, You must have some prior knowledge of some website / html editing. You can insert your logo , advertisement and lot more in this page. After you are done, simply Upload the file back from where you downloaded it. use drag n drop feature. For beginners, I recommend you not to change any default variable, just ad your logo n text , After you are familiarized with the structure, you can build your own fully customized login page.
Good examples of hotspot login page can be found at following link.
Howto Redirect User to your selected site after succesful Login
If you want that after successful login to hotspot , user must be redirected to your advertisement web site / any other web, then You will need to replace a variable on the hotspot/login.html document on the mikrotik router.
You must replace $(link-orig) with the url of the website you want them to get after login.
You must replace $(link-orig) with the url of the website you want them to get after login.
There are two links that you have to replace, and both look like this:
1
| input type=hidden name=dst value=$(link-orig) |
Change them to
1
| input type=hidden name=dst value=https://aacable.wordpress.com |
Now after successful login, user will automatically redirected to yoursite.com, you can also create your customized page showing users details using the variables available.
Howto Allow URL for some destinations for non authenticated Users
Sometimes it is required to allow access to some destinations / URLs for non authenticated users, for example if you have a web / radius server and you want that user can access it without login to hotspot, then you can add its ip address in walled garden.
1
2
3
4
| /ip hotspot walled-garden add dst-host=www.website.com/ip hotspot walled-garden ip add dst-address=192.168.2.2 action=acceptOR/ip firewall nat add chain=pre-hotspot dst-address=192.168.2.2 action=accept |
HOTSPOT users can’t communicate with each other on LAN or PROXY-ARP issue
If you face hotspot broadcast issue / arp-poisoning , problem, Remove the address pool from the Hotspot to turn off Universal NAT,
1
2
3
4
| /ip hotspot set number address-pool=noneOR/ip hotspot set numbers=hotspot1 address-pool=noneOR |
Howto Bypass authentication for Few Clients
This bypasses the hotspot by mac address.
1
| /ip hotspot ip-binding add mac-address=xx:xx:xx:xx:xx:xx type=bypassed |
(change xx:xx:xx:xx:xx:xx with your user’s mac address. You can also use the ip address to bypass.
HOTSPOT FLAGS,
HOTSPOT FLAGS,
S – static, If you have the lease set as a static dhcp lease (assigns same ip every time device requests one) it shows as static. That is in “/ip dhcp-server lease” using “make-static”.
S – static, If you have the lease set as a static dhcp lease (assigns same ip every time device requests one) it shows as static. That is in “/ip dhcp-server lease” using “make-static”.
H – DHCP,
D – Dynamic,
A – If someone connects to the hotspot, they show up in the Hosts tab but are not yet authorized. Once they log in, they show up in the Active tab and are now authorized.
P – bypassed > Go to IP > Hotspot > IP Bindings > and add a new item. One of the “type” options is bypassed, which simply means they don’t have to login. From the wiki, “bypassed – performs the translation, but excludes client from login to the HotSpot”
============
Some more flags for ROUTE
Some more flags for ROUTE
X – Disabled, not active
A – Active, in use
C – Connected, a directly connected host route
S – Static, added manually
R – RIP route, received from the routing information protocol
B – BGP, received from the border gateway protocol
O – Received from the open shortest path first protocol
M – Received from the mesh made easy protocol
B – Blackhole route, packets are silently discarded
U – Unreachable, discards the packets and sends an ICMP unreachable messages
P – Prohibit, discards packet and sends an ICMP communication administratively prohibited
message
How to stop Hotspot Shield on Mikrotik Server
Its being long time that people like me were trying to block the hotspot shield on their networks using Mikrotik server.
/ip firewall mangle
add action=add-dst-to-address-list address-list=WhiteList \
address-list-timeout=4d4h chain=prerouting comment=WhiteList content=\
!127.0.0.1:895 disabled=no dst-port=80 protocol=tcp
add action=add-src-to-address-list address-list=HotSpotShieldUsers \
address-list-timeout=1h chain=prerouting comment=HotSpotShieldUsers \
content=127.0.0.1:895 disabled=no dst-port=80 protocol=tcp
add action=add-dst-to-address-list address-list=WhiteList \
address-list-timeout=4d4h chain=prerouting comment=WhiteList content=\
!127.0.0.1:895 disabled=no dst-port=443 protocol=tcp
/ip firewall filter
add action=drop chain=forward comment=”\”Block HotSpot Shield\”" disabled=no \
src-address-list=HotSpotShieldUsers
How to Block Facebook on MikroTik
If your broadband network operates through a MiktroTik router, then you can block your children and others in your household from accessing Facebook. To do this, you must have WinBox, a console application that allows you to fine-tune all your MikroTik router settings. With it, you can log directly into your router via your computer and then submit specific terminal commands to block any and all Facebook Internet content.
Instructions
Instructions
- 1Launch WinBox, and log in to your router account.
- 2Click the "New Terminal" button in the left menu.
- 3Type the following commands into the terminal, and press enter after typing each command:/ip firewall filter add chain=forward content="facebook.com" action=drop comment="Drop Facebook"/ip firewall filter add chain=forward content="www.facebook.com" action=drop comment="Drop Facebook"/ip firewall filter add chain=forward content="apps.facebook.com" action=drop comment="Drop Facebook"/ip firewall filter add chain=forward content="facebook" action=drop comment="Drop Facebook"/ip firewall filter add chain=forward content="facebook.*" action=drop comment="Drop Facebook"
Mikrotik DUAL WAN Load Balancing using PCC method. Complete Script !
Mikrotik DUAL WAN Load Balancing using PCC method. Complete Script !
Following is a complete script for Mikrotik to combine/load balance two DSL lines. In this example I used MikrotikT RB750 5 ports router.
2 ports were connected with two difference DSL Routers,
and 3rd port was connected with User LAN.
Both DSL are of same speed , i.e 10Mb each.
DSL MODEM IP’S
DSL MODEM 1 = 192.168.1.1
DSL MODEM 2 = 192.168.2.1
Also don’t forget to rename the interface names accordingly.
In my personnel experience , If users request are directly hitting Mikrotik configured with PCC , then you will get good load balancing. Usesrc-address as classifier, this way you will get rid of problems like https/broken link, streaming issues etc. Load balancing using this PCCtechnique (src-address) will be effective and balanced approach when more and more connections (from clients) that occurred. I also recommend to use SQUID proxy server along with mikrotik , either parallel or in front or backend , for better response time and it will also increase good browsing experience to users.
If somehow you are not satisfied with the src-address approach,play with the PCC-Classifier, then Try both addresses and ports as the classifier. While this will randomize things the most and in theory give you the most fair allocation of bandwidth, BUT there is also a good chance that it will break certain things like banking web sites and some forums. This is because often times a HTTP requests will generate several connections, so there is a chance that some requests may go out a different route than the initial one, and that will break secure web sites. For that reason I usually stick with src-address for PCC load balancing.
Regard’s
Syed Jahanzaib
All Done ! Now Test the link by putting user load, the more multiple users load you put on it, the better Load Balance result you will get123456789101112131415161718192021222324252627282930313233/ip addressadd address=192.168.0.1/24 network=192.168.0.0 broadcast=192.168.0.255 interface=Localadd address=192.168.1.2/24 network=192.168.1.0 broadcast=192.168.1.255 interface=WAN1add address=192.168.2.2/24 network=192.168.2.0 broadcast=192.168.2.255 interface=WAN2/ip dns set allow-remote-requests=yes cache-max-ttl=1w cache-size=5000KiB max-udp-packet-size=512 servers=221.132.112.8,8.8.8.8/ip firewall mangleadd chain=input in-interface=WAN1 action=mark-connection new-connection-mark=WAN1_connadd chain=input in-interface=WAN2 action=mark-connection new-connection-mark=WAN2_connadd chain=output connection-mark=WAN1_conn action=mark-routing new-routing-mark=to_WAN1add chain=output connection-mark=WAN2_conn action=mark-routing new-routing-mark=to_WAN2add chain=prerouting dst-address=192.168.1.0/24 action=accept in-interface=Localadd chain=prerouting dst-address=192.168.2.0/24 action=accept in-interface=Localadd chain=prerouting dst-address-type=!local in-interface=Local per-connection-classifier=both-addresses-and-ports:2/0 action=mark-connection new-connection-mark=WAN1_conn passthrough=yesadd chain=prerouting dst-address-type=!local in-interface=Local per-connection-classifier=both-addresses-and-ports:2/1 action=mark-connection new-connection-mark=WAN2_conn passthrough=yesadd chain=prerouting connection-mark=WAN1_conn in-interface=Local action=mark-routing new-routing-mark=to_WAN1add chain=prerouting connection-mark=WAN2_conn in-interface=Local action=mark-routing new-routing-mark=to_WAN2/ip routeadd dst-address=0.0.0.0/0 gateway=192.168.1.1 routing-mark=to_WAN1 check-gateway=pingadd dst-address=0.0.0.0/0 gateway=192.168.2.1 routing-mark=to_WAN2 check-gateway=pingadd dst-address=0.0.0.0/0 gateway=192.168.1.1 distance=1 check-gateway=pingadd dst-address=0.0.0.0/0 gateway=192.168.2.1 distance=2 check-gateway=ping/ip firewall natadd chain=srcnat out-interface=WAN1 action=masqueradeadd chain=srcnat out-interface=WAN2 action=masqueradePCC WITH UN-EQUAL WAN LINKS
If you have Un-Equal WAN Links, for example WAN,1 is of 4MB and WAN,2 is of 8 Mb, and you want to force MT to use WAN42link more then other because of its capacity, Then you have to Add more PCC rules assigning the same two marks to a specific link i.e WAN2 , something like
Code:
123add chain=prerouting dst-address-type=!local in-interface=Local per-connection-classifier=both-addresses-and-ports:2/0 action=mark-connection new-connection-mark=WAN1_conn passthrough=yesadd chain=prerouting dst-address-type=!local in-interface=Local per-connection-classifier=both-addresses-and-ports:2/1 action=mark-connection new-connection-mark=WAN2_conn passthrough=yesadd chain=prerouting dst-address-type=!local in-interface=Local per-connection-classifier=both-addresses-and-ports:2/2 action=mark-connection new-connection-mark=WAN2_conn passthrough=yesPCC WITH HOTSPOT (Reference)
1/ip firewall nat add action=accept chain=pre-hotspot disabled=no dst-address-type=!local hotspot=authMikrotik Hotspot Non-Payment Reminder
Open Mikrotik Terminal and paste below script
Instruction:123456/iphotspot profileadd advertise=yesadvertise-interval=0s advertise-timeout=1m advertise-url=\/reminder.html idle-timeout=none keepalive-timeout=2m name=Non-Payment \open-status-page=always rate-limit=128000/128000session-timeout=5m \shared-users=1 status-autorefresh=1m transparent-proxy=yes
i. Copy your reminder.html file in hotspoty directory.
ii. Delete the file radvert.html in hotspot directory.Payment Reminder – Mikrotik PPPoE/Vpn Server
# Abubaker Siddiq Lasania# virtualitsupport.wordpress.com# virtualitsupport.0fees.net# facebook.com/virtualitsupportpk# facebook.com/groups/virtualitsupportpk1###########################################################################/ip pooladd name=Expired-Pool ranges=172.16.1.1-172.16.1.255/ip firewall filteradd action=reject chain=forward dst-port=!80,8080 protocol=tcp src-address=172.16.1.1-172.16.1.255/ip firewall natadd action=redirect chain=dstnat comment="Non Payment Message" dst-port=80 protocol=tcp src-address=172.16.1.0/24 to-addresses=0.0.0.0 to-ports=8080# 192.168.0.251:8000 is local web server you can define as per your local server ip/ip proxy accessadd action=deny comment="Non Payment" redirect-to=192.168.0.251:8000/nonpayment.html src-address=172.16.1.0/24/ppp profileadd dns-server=10.0.0.1 local-address=10.0.0.1 name=pppoe-expired rate-limit=128k/128k remote-address=Expired-Pool#If you are using User Mananer Mikrotik Radius Paste Below script/tool user-manager profile limitationadd address-list="" download-limit=0B group-name="" ip-pool=Expired-Pool name=\NonPayment rate-limit-min-rx=131072B rate-limit-min-tx=131072B \rate-limit-rx=131072B rate-limit-tx=131072B transfer-limit=0B upload-limit=\0B uptime-limit=0s/tool user-manager profileadd name=Expired-Pool name-for-users=Expired-Pool override-shared-users=off owner=admin price=0 starts-at=logon validity=20d
Mikrotik Usermanager DhcpUser Manager configuration
First, you need to download and install User Manager package;
Create User Manager subscriber (root customer). Note that when using a version 3.0 or newer,
a subscriber called ‘admin’ is created automatically – you can skip the following stage and change ‘MikroTik’ to ‘admin’ in subsequent steps;
Now add Router Information/tool user-manager customer add login="virtual" password="12345" permissions=owner
Now Setup Limitation under Profiles/tool user-manager router add customer=admin disabled=no ip-address=127.0.0.1 name=virtual shared-secret=123456789
After limitation now we add Profiles/tool user-manager profile limitationadd name=256k rate-limit-min-rx=65536B rate-limit-min-tx=262144B rate-limit-rx=65536B rate-limit-tx=262144Badd name=512k rate-limit-min-rx=131072B rate-limit-min-tx=131072B rate-limit-rx=131072B rate-limit-tx=524288Badd name=768k rate-limit-min-rx=196608B rate-limit-min-tx=196608B rate-limit-rx=196608B rate-limit-tx=786432Badd name=1Mb rate-limit-min-rx=262144B rate-limit-min-tx=1048576B rate-limit-rx=262144B rate-limit-tx=1048576B
● Step 1
Create a profile name 256 and click Create
● Step 2
Select Add new limitation and select profile limitation (previously created) select limit and then add
● Step 3
Now add name for user validity and set selling price and then save profile
Validity
▪ 4w2d = 30day
▪ 2w = 14day
▪ 1w = 7day
▪ 1d = 1day
▪ 1h = 1Hour
Final profile screen
Now we add user into User Section
Add Users detail and select desire package and save
After all set in Mikrotik Users Manager now we need to set dhcp server radius section.
Final we need to set radius server to connect User Manager
Howto exempt rate limit for FTP Server Behind MT DMZ in placment of Dynamic Queues
As you can see, FTP servers are placed behind Mikrotik DMZ, when user connects via pppoe server, dynamic queue is created for that user according to his package, lets say 512k, now the problem is this restriction also applied on local FTP server placed behind mikrotik DMZ,and we don’t want to limit speed for Local FTP.
The solution I found was to make mangle rules that mark packets TO/FROM the FTP server, and add Queue tree at my desired speed or at line speed for those marks.
This works for me. JUST MAKE SURE YOUR FTP SERVERS HAVE MIKROTIK IP AS THERE DEFAULT GATEWAY :) This is important so that you can user original ip on the the FTP server rather then just mikrotik ip.
Scenario:
172.16.0.0/16 are my pppoe client ip pool.
192.168.250.0/24 is FTP server pool. Behind Mikrotik DMZ.
On mikrotik, I created following rules and FTP servers exempted from dynamic queue rate limit and ftp data delivered at LAN speed , all works ok :)
[Mikrotik 5.x ROS Code]
/ip firewall mangle add chain=prerouting src-address=172.16.0.0/16 dst-address=192.168.250.0/24 action=mark-packet new-packet-mark=ftp-up/ip firewall mangle add chain=postrouting dst-address=172.16.0.0/16 src-address=192.168.250.0/24 action=mark-packet new-packet-mark=ftp-down/queue type add name=ftp-exempt kind=sfq/queue tree add name=ftp-up parent=global-in packet-mark=ftp-up queue=ftp-exempt max-limit=100M/queue tree add name=ftp-down parent=global-out packet-mark=ftp-down queue=ftp-exempt max-limit=100M[Mikrotik 6.x ROS Code]
/ip firewall mangleadd action=mark-packet chain=prerouting dst-address=192.168.250.0/24 new-packet-mark=ftp-up src-address=172.16.0.0/16add action=mark-packet chain=postrouting dst-address=172.16.0.0/16 new-packet-mark=ftp-down src-address=192.168.250.0/24/queue treeadd limit-at=100M max-limit=100M name=ftp-up packet-mark=ftp-up parent=global queue=ftp-exemptadd limit-at=100M max-limit=100M name=ftp-down packet-mark=ftp-down parent=global queue=ftp-exemptUSER WELCOME PAGE ON MIKROTIK SERVER
USER WELCOME PAGE ON MIKROTIK SERVER/ipfirewall filteradd action=jump chain=forward dst-port=80 jump-target=Reminder \protocol=tcp src-address-list=Reminderadd action=add-src-to-address-list address-list=2_www address-list-timeout=1h \chain=Reminder src-address-list=1_wwwadd action=returnchain=Reminder src-address-list=2_wwwadd action=add-src-to-address-list address-list=1_www address-list-timeout=5s chain=Reminder/ipfirewall natadd action=dst-nat chain=dstnat comment="Redirect to Message Server"dst-port=80 \protocol=tcp src-address-list=1_www to-addresses=192.168.1.6 to-ports=80/ipfirewall address-listadd address=10.10.50.2-10.10.50.10 comment="Reminder to Customer For Payment/Message"list=ReminderEvo – Dsl Loadbalance PCC Method
Before Start Load balancing change WAN Ip address according to your need.
Add Evo 3g Usb Dongle and set user name and password on pppoe client to access internet.
/ip addressadd address=10.0.2.2/24interface=wan2add address=192.168.5.1/24interface=Local/ip firewall natadd chain=srcnat out-interface=pppoe-out1 action=masqueradeadd chain=srcnat out-interface=wan2 action=masquerade/ip firewall mangleadd chain=prerouting in-interface=pppoe-out1 connection-state=newnew-connection-mark=pppoe-out1_conn action=mark-connection passthrough=yesadd chain=prerouting in-interface=wan2 connection-state=newnew-connection-mark=ether2_conn action=mark-connection passthrough=yesadd chain=output connection-mark=pppoe-out1_connnew-routing-mark=to_pppoe-out1 action=mark-routing passthrough=yesadd chain=output connection-mark=ether2_connnew-routing-mark=to_ether2 action=mark-routing passthrough=yes/ip firewall mangleadd chain=prerouting in-interface=Local connection-state=newdst-address-type=!local per-connection-classifier=both-addresses:2/0 action=mark-connectionnew-connection-mark=pppoe-out1_conn passthrough=yesadd chain=prerouting in-interface=Local connection-state=newdst-address-type=!local per-connection-classifier=both-addresses:2/1 action=mark-connectionnew-connection-mark=ether2_conn passthrough=yesadd chain=prerouting in-interface=Local connection-mark=pppoe-out1_conn action=mark-routingnew-routing-mark=to_pppoe-out1 passthrough=yesadd chain=prerouting in-interface=Local connection-mark=ether2_conn action=mark-routingnew-routing-mark=to_ether2 passthrough=yes/ip firewall mangleadd chain=prerouting dst-address=10.0.2.0/24 action=accept in-interface=ether5/ip routeadd gateway=pppoe-out1 distance=1add gateway=10.0.2.1 check-gateway=ping distance=2/ip routeadd gateway=pppoe-out1 routing-mark=to_pppoe-out1add gateway=10.0.2.1 routing-mark=to_ether2 check-gateway=pingMikrotik DUAL WAN Load Balancing using PCC method. Complete Script
Mikrotik DUAL WAN Load Balancing using PCC method. Complete Script !
Following is a complete script for Mikrotik to combine/load balance two DSL lines. In this example I used MikrotikT RB750 5 ports router.
2 ports were connected with two difference DSL Routers,
and 3rd port was connected with User LAN.
Both DSL are of same speed , i.e 10Mb each.
DSL MODEM IP’S
DSL MODEM 1 = 192.168.1.1
DSL MODEM 2 = 192.168.2.1
Also don’t forget to rename the interface names accordingly.
In my personnel experience , If users request are directly hitting Mikrotik configured with PCC , then you will get good load balancing. Usesrc-address as classifier, this way you will get rid of problems like https/broken link, streaming issues etc. Load balancing using this PCCtechnique (src-address) will be effective and balanced approach when more and more connections (from clients) that occurred. I also recommend to use SQUID proxy server along with mikrotik , either parallel or in front or backend , for better response time and it will also increase good browsing experience to users.
If somehow you are not satisfied with the src-address approach,play with the PCC-Classifier, then Try both addresses and ports as the classifier. While this will randomize things the most and in theory give you the most fair allocation of bandwidth, BUT there is also a good chance that it will break certain things like banking web sites and some forums. This is because often times a HTTP requests will generate several connections, so there is a chance that some requests may go out a different route than the initial one, and that will break secure web sites. For that reason I usually stick with src-address for PCC load balancing.
Regard’s
Syed Jahanzaib
All Done ! Now Test the link by putting user load, the more multiple users load you put on it, the better Load Balance result you will get123456789101112131415161718192021222324252627282930313233/ip addressadd address=192.168.0.1/24 network=192.168.0.0 broadcast=192.168.0.255 interface=Localadd address=192.168.1.2/24 network=192.168.1.0 broadcast=192.168.1.255 interface=WAN1add address=192.168.2.2/24 network=192.168.2.0 broadcast=192.168.2.255 interface=WAN2/ip dns set allow-remote-requests=yes cache-max-ttl=1w cache-size=5000KiB max-udp-packet-size=512 servers=221.132.112.8,8.8.8.8/ip firewall mangleadd chain=input in-interface=WAN1 action=mark-connection new-connection-mark=WAN1_connadd chain=input in-interface=WAN2 action=mark-connection new-connection-mark=WAN2_connadd chain=output connection-mark=WAN1_conn action=mark-routing new-routing-mark=to_WAN1add chain=output connection-mark=WAN2_conn action=mark-routing new-routing-mark=to_WAN2add chain=prerouting dst-address=192.168.1.0/24 action=accept in-interface=Localadd chain=prerouting dst-address=192.168.2.0/24 action=accept in-interface=Localadd chain=prerouting dst-address-type=!local in-interface=Local per-connection-classifier=both-addresses-and-ports:2/0 action=mark-connection new-connection-mark=WAN1_conn passthrough=yesadd chain=prerouting dst-address-type=!local in-interface=Local per-connection-classifier=both-addresses-and-ports:2/1 action=mark-connection new-connection-mark=WAN2_conn passthrough=yesadd chain=prerouting connection-mark=WAN1_conn in-interface=Local action=mark-routing new-routing-mark=to_WAN1add chain=prerouting connection-mark=WAN2_conn in-interface=Local action=mark-routing new-routing-mark=to_WAN2/ip routeadd dst-address=0.0.0.0/0 gateway=192.168.1.1 routing-mark=to_WAN1 check-gateway=pingadd dst-address=0.0.0.0/0 gateway=192.168.2.1 routing-mark=to_WAN2 check-gateway=pingadd dst-address=0.0.0.0/0 gateway=192.168.1.1 distance=1 check-gateway=pingadd dst-address=0.0.0.0/0 gateway=192.168.2.1 distance=2 check-gateway=ping/ip firewall natadd chain=srcnat out-interface=WAN1 action=masqueradeadd chain=srcnat out-interface=WAN2 action=masqueradePCC WITH UN-EQUAL WAN LINKS
If you have Un-Equal WAN Links, for example WAN,1 is of 4MB and WAN,2 is of 8 Mb, and you want to force MT to use WAN42link more then other because of its capacity, Then you have to Add more PCC rules assigning the same two marks to a specific link i.e WAN2 , something like
Code:
123add chain=prerouting dst-address-type=!local in-interface=Local per-connection-classifier=both-addresses-and-ports:2/0 action=mark-connection new-connection-mark=WAN1_conn passthrough=yesadd chain=prerouting dst-address-type=!local in-interface=Local per-connection-classifier=both-addresses-and-ports:2/1 action=mark-connection new-connection-mark=WAN2_conn passthrough=yesadd chain=prerouting dst-address-type=!local in-interface=Local per-connection-classifier=both-addresses-and-ports:2/2 action=mark-connection new-connection-mark=WAN2_conn passthrough=yesPCC WITH HOTSPOT (Reference)
1/ip firewall nat add action=accept chain=pre-hotspot disabled=no dst-address-type=!local hotspot=authMikrotik PPPOE Server
you can use this configuration for PPPoe server that users get public ip. if range of public ip is 192.168.1.0/24 and ip of router is 192.168.1.4 and ip of gateway is 192.168.1.1 first for router set this ip
then write 1 route for describe gateway:
NOTE: is better in interface change ARP condition to proxy-arp
then for user you can provide ip. we provide 245 ip for users in IP>POOL:
if pppoe setup over other ethernet port like LOCAL
now for setup PPPOE server look for PPP and in Profiles and click on add bottom:
well now router for made PPPoE server is ready in PPP click PPPoE servers tab and click add bottom:
for make username and passoword in light scale in Secrets tab in PPP click on add bottom :
for better manage on users traffic you can apply radius server and for bandwidth use queue.
For More Detail :- http://wiki.mikrotik.com/wiki/PPPOE_Server
Mikrotik 3.2 Installation In Urdu Part2


- 1


2 comments:
My response on my own website. Appreciation is a wonderful thing...thanks for sharing kepp it up.
MikroTik Crack
Exiland Backup Professional Crack
Veritas Backup Exec Crack
Pixellu SmartAlbums Crack
Excellent post, Its really friendly article...
Razer Surround Pro Crack
Paragon Hard Disk Manager Crack
Driver Talent Crack
HMA Pro VPN Crack
Garden Planner Crack
Thanks For Post which have lot of knowledge and informataion thanks.
Save Wizard PS4 crack
AVS Video Editor crack
Mikrotik RouterOS crack
Live Home 3D Pro crack
Post a Comment